November 19, 2018 at 4:05 PM
Getting behind the wheel of your van ready for a day's work and being faced with a dead battery is not an ideal way to start the day. No matter how much reliability improves with modern vehicles, the battery can still let us down without any warning.
Whether the lights have been left on overnight or the battery is faulty, you're faced with the prospect of having to jump start your van to get it going. Learning how to jump start a vehicle is an important skill that will serve you well to know.
Although it can be a daunting experience, the process is relatively simple. Follow our step-by-step guide to jump start your van.
BEFORE YOU START
You'll need a couple of items before you can attempt to jump start your van:
- Jump leads
- A working battery from another vehicle with at least the same voltage
In terms of safety, you should make sure that any loose clothing is secured, all metal objects are kept away from the batteries and people aren't smoking in the vicinity of where you're attempting the jump start.
It's important to read the handbook for your van and any instructions on your jump leads. The steps in this post are generic and you should always follow any specific instructions provided for your van or equipment.
Park the vehicles bumper-to-bumper or side-by-side - depending on where you are - and put them both in neutral or park, switching both engines, heaters, radios and other electronics off. Make sure that the vehicles aren't touching because you don't want them to complete a circuit through the bodywork.
Open the bonnet of your van and the other vehicle to access their batteries. If you notice that either of the batteries are cracked or damaged, do not attempt a jump start. Call breakdown cover immediately and get it looked at by a professional.
HOW TO JUMP START A VAN
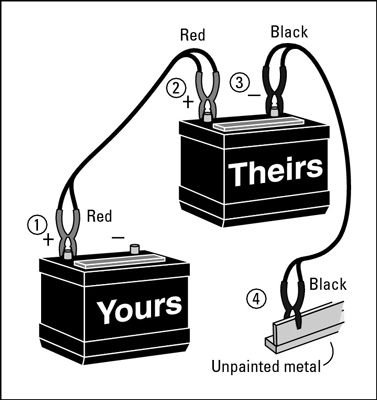
There is a specific order that you need to connect the jump cables to each of the vehicles, so follow these instructions very closely:
- Connect one end of the red (positive) jump lead to the positive (+) terminal on the dead battery
- Connect the other end of the red jump lead to the positive terminal on the support battery
- Connect one end of the black (negative) jump lead to the negative (-) terminal on the support battery
- Connect the other end of the black jump lead to a suitable earthing point (e.g. a metal bolt or bracket) under the bonnet of the vehicle with the dead battery - some vans have negative jump starting poles for this situation. This should be away from the battery and fuel system
- Start the support vehicle and let it run for a couple of minutes. Revving the engine a little will help to produce more current for the battery
- Try to start your van - if it doesn't turn on at the first time of asking, wait a couple of minutes before trying again. If it still doesn't turn on, you should call breakdown cover who can attempt to fix your van at the roadside or take it to a local garage
- Once your van is running, leave both the engines on for at least five minutes to charge the dead battery
DISCONNECTING THE JUMP LEADS
After you've left the van running for a while, the jump leads need to be removed in reverse order. Because they have had an electrical current passing through them, they will be charged so it's extemely important to not let any of the jump leads touch any metal.
- Switch both engines off
- Disconnect the black jump lead from your van
- Disconnect the black jump lead from the support battery
- Disconnect the red jump lead from the support battery
- Disconnect the red jump lead from your van
Once all of the jump leads have been disconnected and are safely packed away, try to start your van again. Hopefully it will start up, and if it does, you need to drive it around for at least 20 minutes to charge the battery.
If the van won't start again after this process then the battery has completely died and needs to be replaced.